I recently purchased a Lemur Pro (lemp10) from System76. It’s a great little machine, very fast and portable and I couldn’t be more satisfied.
One thing I did not enjoy very much was the default fan curve. It was not a major issue, but over time it started bugging me.
After many hours attempting to hack the fan curve via the OS, I finally gave up and decided that I would flash the firmware, making use of the fact that System76 open sources all the good stuff.
The guide bellow outlines the steps I took to flash the firmware on my Lemur Pro, but they should be roughly the same for other models.
Be warned: Flashing firmware manually has risks and may brick your system. It is not recommended for the normal user. Use this guide at your own risk.
Step by step guide: Flashing the firmware
1. Clone the firmware repo
git clone https://github.com/system76/firmware-open.git
cd firmware-open
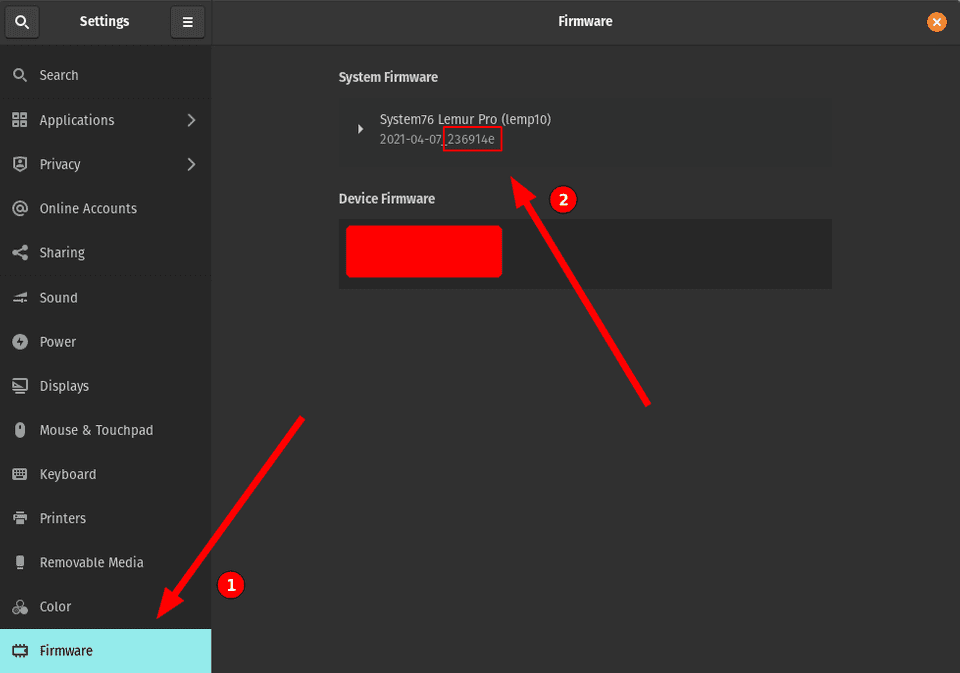
2. Checkout the branch that corresponds to your current firmware version
a. The image bellow shows how you can find your current firmware version:
b. Checkout the code with your firmware version:
# Replace 236914e with your actual version (see settings picture above)
git checkout 236914e
3. Pull submodules and install dependencies
git submodule init
git submodule update
./scripts/deps.sh
source ~/.cargo/env
cd ec
4. Customize your fan points
Add or edit the following lines:
# SPDX-License-Identifier: GPL-3.0-only

EC=it5570e

# Enable eSPI
CFLAGS+=-DEC_ESPI=1

# Add keymap to src
KEYMAP?=default
SRC+=$(BOARD_DIR)/keymap/$(KEYMAP).c

# Set keyboard LED mechanism
KBLED=white_dac
CFLAGS+=-DKBLED_DAC=2

# Set battery I2C bus
CFLAGS+=-DI2C_SMBUS=I2C_4

# Set touchpad PS2 bus
CFLAGS+=-DPS2_TOUCHPAD=PS2_3

# Set smart charger parameters
#TODO: Find out why input current must by divided by two
CFLAGS+=\
	-DCHARGER_CHARGE_CURRENT=1536 \
	-DCHARGER_CHARGE_VOLTAGE=8800 \
	-DCHARGER_INPUT_CURRENT=1600

# Set battery charging thresholds
CFLAGS+=\
	-DBATTERY_START_THRESHOLD=0 \
	-DBATTERY_END_THRESHOLD=100

# Custom fan curve
CFLAGS+=-DBOARD_HEATUP=5CFLAGS+=-DBOARD_COOLDOWN=20CFLAGS+=-DBOARD_FAN_POINTS="\	FAN_POINT(55, 25), \	FAN_POINT(60, 30), \	FAN_POINT(65, 30), \	FAN_POINT(70, 40), \	FAN_POINT(75, 50), \	FAN_POINT(80, 60), \	FAN_POINT(85, 70), \	FAN_POINT(90, 80) \"
# Add system76 common code
include src/board/system76/common/common.mk
Above is the fan curve I chose to use. You can add or change FAN_POINTs to your liking.
How it works: FAN_POINT(70 40) means ‘If over 70 celsius for 5 seconds, turn fan on to 40%‘.
5. Create config.mk file and place your laptop model inside
# Replace lemp10 with your laptop model
BOARD?=system76/lemp10
6. Test build
makeIf you get no errors you may go ahead to the next step.
7. Flash it
If you got no errors in the step above, you are now ready to flash the firmware. Close all applications and run:
make flash_internalYour fans will be set to maximum speed during the process. When it finishes the laptop will shutdown.
Turn it back on, and your new fan points will have been applied.
